Monday, January 20, 2014

Breakfast Enchiladas

A couple of years ago my mother-in-law gave me a recipe she saw in Southern Living magazine for breakfast enchiladas.  She hadn't tried it but but looked good to her and she has a good eye for that kind of thing. I'm SO glad she gave me the recipe.  We both gave it a try and it was delicious!  This is the kind of thing you make on Christmas Eve so you can pop in the oven on Christmas morning.  There are a lot of steps but when you make it like that, it seems so easy.

You can top the enchiladas with toppings of your choice; pico de gallo, fresh cilantro, guacamole.  At my house, we like it simple...a generous scoop of my Seriously Easy All-Canned Salsa!

Breakfast Enchiladas

Printable Version
easilymadeeasilybroken.blogspot.com

1 (1 lb) package ground pork sausage
2 Tbsp butter
3 Tbsp dried cilantro
14 large eggs, beaten
¾ tsp salt
½ tsp pepper
Cheese Sauce (below)
8 (8-inch) soft taco-size flour tortillas
1 cup shredded Cheddar Cheese or Mexican Blend

1.  Preheat oven to 350˚ (skip this step if you are pre-making the night before). 

2.  Brown the sausage in a skillet over medium-high heat, stirring frequently, until sausage is in crumbles and is cooked all the way through.  Remove from skillet and drain on paper towels (drain well!).  Wipe the skillet clean.

3.   Melt butter in skillet over medium heat.  Add cilantro and sauté briefly.  Add eggs, salt, and pepper, and cook, without stirring, for 2 minutes or until eggs begin to set.  Gently stir around the edges of the eggs to draw them away from the side of the pan to make large pieces.  Cook through, stirring occasionally, 4-5 minutes until eggs are thickened but still moist.  Remove from heat and fold in 1 ½ cups of Cheese Sauce and sausage.

4.  Spoon about ¾ cup egg mixture down the middle of each tortilla and roll up.  Place the filled tortilla seam-side down, in a lightly greased 13x9-inch baking dish.  Pour the remaining Cheese Sauce over the tortillas; sprinkle with cheddar cheese (skip this if you are pre-making the night before.  Instead, cover the tortillas and put the remaining cheese sauce in a container to refrigerate until you are ready to bake it).

5.  Bake at 350˚ for 30 minutes or until sauce is bubbly.  Serve with salsa.  

Cheese Sauce
1/3 cup butter
1/3 cup all-purpose flour
3 cups milk
1 (8-oz) block Cheddar Cheese, shredded
1 can Rotel diced tomatoes and green chiles, drained
¾ tsp salt

1.  Melt butter in a heavy saucepan over medium-low heat.  Whisk in flour until smooth.  Cook, whisking constantly, for one minute.
2.  Gradually whisk in milk.  Cook over medium heat, whisking constantly, for 7 minutes or until thickened.

3.  Remove from heat, and whisk in remaining ingredients until cheese is melted.


Monday, December 23, 2013

Eggnog Cupcakes with White Chocolate Frosting

My kids pretty much gag at the idea of eggnog.  I don't know if it's too thick or just too strong of a flavor but it's not a holiday flavor they enjoy...until now.  They've definitely figured out a way that the flavor of eggnog tastes good to them - in my eggnog cupcakes with white chocolate frosting.

These cupcakes are super easy to make because they use a boxed cake mix and a little eggnog, plus my awesome, not-too-sweet, white chocolate frosting recipe.


Eggnog Cupcakes with White Chocolate Buttercream


1 box yellow cake mix
1 cup eggnog
1/3 cup vegetable oil
3 eggs
2 ½ tsp nutmeg

1.  Preheat oven to 350˚.  Line muffin tin with 24 cupcake liners.
2.  Mix all ingredients and then beat on medium for 2 minutes.
3.  Divide the batter into the cupcake liners.  Fill about 2/3 full.
4.  Bake for about 18-23 minutes, until the cupcake springs back to the touch.  Allow cupcakes to cool completely before frosting.
5.  Using a piping bag and a tip, frost the tops of the cupcakes with white chocolate frosting.


White Chocolate Buttercream Frosting
Ingredients
4 1/2 cups powdered sugar
1/2 cup unsalted butter, at room temperature
2 tsp vanilla extract
3/4 cup white chocolate chips, melted and cooled
2-3 Tbsp milk

In your mixing bowl, slowly mix together the butter, sugar, vanilla extract, and melted white chocolate.  Gradually add milk until frosting is at the consistency you want.

Sunday, November 24, 2013

Ro-Tel Queso Con Carne

You've probably had Ro-Tel cheese dip at some party or function because it's so easy and so good.  This has been a staple in our house since...well, since I figured out Sunday football is a snacking kind of day.  It's usually made with some VELVEETA and Ro-Tel tomatoes and green chilies melted together.  We have our own little twist on this already awesome dip, though.  My husband is a meat and potatoes kinda guy.  In this case, though, he's a meat and cheese kinda guy.  He likes meat in his queso (cheese).  So, we added a little chili, added a little meat, and have our favorite Ro-Tel Queso con Carne.

This recipe only calls for 1/2 a pound of taco meat.  You can just make 1/2 a pound and cut the  taco seasoning in half or do like we do -- make the whole pound and enjoy some tacos with your queso.


1 lb. VELVEETA, cut up into cubes
2 cans Ro-Tel (choose your heat!)
1 can Wolf Chili (or other chili without beans if you can't get Wolf)
1/2 lb ground beef seasoned with taco seasoning (follow the directions on the taco seasoning packet or use the homemade taco seasoning I posted here)

1.  Combine the VELVEETA, Ro-Tel (undrained), chili, and taco meat in a large microwaveable bowl.
2.  Place in microwave for 2 minutes.  Stir.
3.  Microwave again for 1 minute.  Stir.  Repeat until the VELVEETA is completely melted.

Serves...a LOT.

This recipe is not only awesome for its deliciousness but it is crockpot-able.  Meaning, if you've got the time, you can do this all in your crockpot.  Throw all the ingredients into your crock pot.  Set the temperature to low and let it all melt together, stirring occasionally.  This takes about 2 hours.  Once it's melted, turn the setting to warm and you've got a ready made cheese dip.


Thursday, November 14, 2013

White Chocolate & Pumpkin Cupcakes with White Chocolate Frosting

If you've read any of my other posts, you might know that I'm not a big fan of white chocolate.  I don't like white chocolate candy bars, nor do I like anything dipped in white chocolate.  I am, however, a huge fan of white chocolate chips baked in almost anything.  My favorite cookie is white chocolate with macadamia nuts.  Something about the buttery cookie mixed with the white chocolate is so good.

That said, these are not cookies but they're still so yummy!  I used my pumpkin cupcake recipe, added a few white chocolate chips, and topped with a delicious (and not too sweet) white chocolate buttercream frosting.  Even my husband who never eats all of his frosting thought this frosting was yum!


White Chocolate & Pumpkin Cupcakes with White Chocolate Frosting

Printable version
easilymadeeasilybroken.blogspot.com
Ingredients
1 cup all-purpose flour
1 tsp baking powder
½ tsp baking soda
½ tsp kosher salt
1 tsp ground cinnamon
½ tsp ground ginger
½ tsp ground nutmeg
2 large eggs
1 cup canned pumpkin puree, not pie filling
½ cup granulated sugar
½ cup light brown sugar, lightly packed
½ cup vegetable oil
3/4 cup white chocolate chips
White Chocolate buttercream frosting (see below)

1.  Preheat oven to 350˚.  Line muffin tin with cupcake liners (12).

2.  In a medium bowl, combine the dry ingredients: flour, baking powder, baking soda, salt, cinnamon, ginger, and nutmeg. In a larger bowl or mixer, combine the eggs, pumpkin, granulated sugar,brown sugar, and vegetable oil and whisk together.  Gradually add the flour mixture to the wet ingredients and mix until combine.
3. Fold the white chocolate chips into the batter.
4.  Divide the batter into the cupcake liners.  Fill about 2/3 full.
5.  Bake for 20-25 minutes, until the cupcake springs back to the touch.  Allow cupcakes to cool completely before frosting.
6.  Using a piping bag and a tip (I use Wilton 1M Star tip),frost the tops of the cupcakes with white chocolate frosting.  Top with chopped pecans and a sprinkle of pumpkin pie spice. 

White Chocolate Buttercream Frosting
Ingredients
3 cups powdered sugar
1/3 cup unsalted butter, at room temperature
1 tsp vanilla extract
3/4 cup white chocolate chips, melted and cooled
2-3 Tbsp milk 

In your mixing bowl, slowly mix together the butter, sugar, vanilla extract, and melted white chocolate.  Gradually add milk until frosting is at the consistency you want.


Serves 12


Wednesday, November 6, 2013

S'mores Brownie Pie

S’mores always remind me campfires.  Even when we make them at home – in the microwave, no less – it still gives a camping feeling.  Now that cooler weather is coming, we get the fire going inside but we use a gas fireplace instead of a real wood fire.  It’s a little hard to make s’mores in the gas fireplace so I make s’mores brownie pie instead.

These brownies are reminiscent of campfire s’mores.  With a graham cracker crust, a brownie filling, and toasted marshmallows on top, this rich brownie pie will sweeten you up in one bite.  Not to mention the chocolate icing drizzle on top that puts you into sugar overload.  Even though it's called a pie, this makes way more than what can fit in a traditional pie pan.  I used a rectangular pan like I would use for brownies so these are really more like brownies with a graham cracker crust.

S’mores Brownie Pie

Ingredients
Crust
2 cups graham cracker crumbs (about 2 wrapped packages from the box)
½ cup butter, melted
¼ cup sugar
Brownie Filling
2 cups sugar
½ cup semisweet chocolate chips
1 cup butter
1 ½ cups all-purpose flour
½ cup unsweetened cocoa powder
4 large eggs
1 tsp vanilla
¾ tsp salt
Marshmallow Topping
3 cups regular size marshmallows cut in half
2 cups mini-marshmallows
Chocolate Icing
¼ cup butter
3 Tbsp unsweetened cocoa powder
3 Tbsp milk
2 cups powdered sugar
½ tsp vanilla

1.  Crust:  Mix the ingredients for the crust --  2 cups graham cracker crumbs, ½ cup melted butter, and ¼ cup sugar.  Press on bottom and sides of a 9 x 12 inch pan.

2.  Brownie Filling:  Add the chocolate chips and 1 cup butter to a large bowl and heat on high in the microwave for 1 minute, stirring every 30 seconds.

Whisk in the flour, ½ cup unsweetened cocoa powder, eggs, vanilla, and salt until blended.  Pour into graham cracker crust.

Bake at 350˚ for 60-75 minutes.  Remove from oven and cool for 20 minutes.

3.  Marshmallow Topping:  Preheat the broiler on low.  Put your brownie pan on a cookie sheet.  Mix the two types of marshmallows in a large bowl and add to the top of your baked brownies.  Broil for 30-60 seconds until golden brown.  Remove from oven and cool.

4.  Chocolate Icing:  On medium heat, mix ¼ cup butter, 3 Tbsp unsweetened cocoa powder, and 3 Tbsp milk, whisking constantly until thickened.  Whisk in the powdered sugar and ½ tsp vanilla extract until smooth.

Drizzle chocolate icing over the marshmallows.

Serves approximately 12.

I still feel like these are missing some graham cracker taste to them.  I’ll probably add some chopped up graham crackers after I broil the marshmallows.

*Original recipe was a Mississippi Mud S'mores-Fudge Pie from Southern Living.  I guess I took the Mississippi Mud out of it and just made it s'mores. 


Tuesday, November 5, 2013

Crockpot Barbequed Beef Sandwiches

Like most busy moms and probably dads too, I’m a big fan of the crockpot or slow cooker.  I try to schedule a couple of days a week to use my Crock-pot for our dinners.  It’s usually on a soccer night because it’s too hard to cook something up when we’re leaving the house a little after 5 pm and not getting home until 9.

The Crockpot Barbequed Beef is delicious meal that satisfies nearly everyone in my family.  That’s hard to do with my picky boys, including my husband!  You can use a bottled barbeque sauce for this but I love the sweet and tangy combo that this homemade barbeque sauce provides (don’t tell my picky husband it has mustard in it).  Even though the meat is not really barbequed, it still has a bit of a smokey taste to it.  So yummy and makes a ton to feed up to 12 people so I get plenty of leftovers to freeze and serve later in the week.

Note: The recipe calls for House Seasoning which is on my blog here but if you don't want to make a whole batch, just use 1/2 tsp salt, 1/4 tsp pepper, 1/4 tsp garlic powder.  

Crockpot Barbequed Beef Sandwiches

Ingredients
3 lbs boneless chuck roast
1 ½ cups ketchup
2 tbsp Dijon-style mustard
¼ cup packed brown sugar
¼ cup red wine vinegar
2 tbsp Worcestershire sauce
1 tsp liquid smoke

1.  Combine all ingredients in a bowl, except roast.

2.  Put chuck roast in the Crockpot.

3.  Pour the sauce mixture over the roast in the crockpot.

4.  Cover and cook on low for 8-10 hours or high for 4-5 hours.

5.  After it’s cooked completely, remove the roast and shred (I just use two forks to tear it all apart).  Place the meat back in the crockpot to cover with sauce.


6.  Serve on hamburger buns or toasted bread and top with pickles and onions, if desired.  I actually put jalapeños on mine – adds a little spiciness to it.


Because this makes so much, it’s fun to come up with new ideas for leftovers.  I really enjoy using it as a topping for baked potatoes.  We also like to eat it wrapped up in corn tortillas.  It’s a little too sweet to consider it a brisket taco but it’s still good!

Saturday, November 2, 2013

"Leftover Chicken" Chimichangas

My family My husband and I love Tex-Mex food.  I wasn't always a huge Tex-Mex fan but when I met my husband I tried a little more and grew to love it.  One of the things he got me to try was a chimichanga.  I had never heard of this before but it was something that he always ordered.  It's really just a stuffed burrito, or a tortilla filled with cheese and meat, but it's fried -- which makes it so much better than just a burrito.

When we have chicken or beef leftovers, we regularly make a new meal out of it.  I love to make chimichangas because it never tastes like leftovers!  You can use all different types of meat and in different forms, from chopped, to shredded, to ground.  While it does take a bit of practice to get your tortillas folded right, it's not really hard.  You often just have to keep an eye on it to make sure it doesn't become unfolded during the frying process.

I am not a pro at making chimichangas.  I just do what works for me.  When I originally started making these I tried to follow a recipe the required using egg whites to "glue" the tortillas together and then deep frying them.  That did not work for me.  They popped open every time.  I even tried adding toothpicks.  The insides still oozed out.  Sometimes this method still messes up on me but it's a lot more mess proof for me than other methods I've tried.

"Leftover Chicken" Chimichangas

Printable Version
easilymadeeasilybroken.blogspot.com

Ingredients

Leftover chicken - chopped, shredded, or ground (approx 1 cup)
1 cup shredded cheddar cheese
4 burrito size tortillas
garlic salt
cayenne (optional)
Vegetable oil

1.  Pour your oil into a pan about 1 inch deep for frying.  While you're prepping your chimichangas, heat the oil on medium low heat.

2.  Lay out your tortilla and fill the center of it with about 1/4 cup of shredded cheese.  Sprinkle it with your seasonings.  We always use garlic salt and cayenne but you can use your favorite seasonings.  Top the filling with about 1/4 cup of chicken.

3.  Bring the edges up on each side of the burrito to ensure the filling is completely in the center.  Then begin to fold the burrito.

4.  Once you've got your pocket of goodness, place it seam side down in the pan of hot oil.  It shouldn't be too hot or the outside will brown but the cheese inside won't melt.  Fry until the tortilla turns golden brown on the bottom and then flip it (about 5-8 minutes).  

It should have cooked long enough that the tortilla will stay folded up when you flip it but it doesn't always work that way.  You may have to keep tongs or your flipper pressed on the chimichanga to make sure it stays put.

5.  After it's golden brown on the other side, take it out of the oil and place on a plate with a paper towel to absorb some of the oil.

6.  Let it cool and then top with your favorite ingredients.  We like to put queso or melted cheese on them but tonight, we just had them plain with a little salsa on the side.


Wednesday, October 30, 2013

Candy-Coated Pretzels in Sprinkled Boxes

This really isn't about the candy-coated pretzels as much as it is about the cute containers I put them in.  I love these french fry boxes!  

I got a few of these white french fry containers with the idea that I could put treats in them for gifts.  They come blank though and I couldn't figure out what I wanted to do with them until I saw this post on jacksandkate.com with directions on adorable sprinkled party hats.  Using Halloween sprinkles, I semi-emulated her party hats and I love the way they turned out!

Even if you don't have blank french fry boxes, you could use any white box to turn it into an awesome gift box.  In fact, I may be doing the same thing at Christmas and using a plain white gift box to hold tasty goodies for the neighbors.  It might be easier too with a bigger "canvas."

Sprinkled French Fry Boxes


Here's how I decorated the french fry boxes.  I just can't wait to share because I love them so much!

Materials
French fry containers
hot glue gun/glue sticks
Candy sprinkle balls (the smaller the better)
Font pattern
Pen or pencil for tracing

First, select fonts and size them to fit on the front of the french fry boxes. (I used these words and edited the format so they would be an outline. You don't really need to do that but I did it so I would know exactly what to trace.)  Then, print them out on plain white printer paper.

After centering the words where you want them, trace the letters.  I used a red pen so I'd know where I traced.  Press hard so the indentation will show through on the box.  Once done tracing, lift the paper and there should be an outline of the words on the box (in the second picture below) 


Outline each letter you want covered in sprinkles with hot glue.  Cover it in sprinkles just like glitter, shake off the excess, and move on to the next letter.  Complete one letter at a time to ensure the glue stays hot.


You may have to use a toothpick to emphasize the holes or ensure there is space between your letters.

I wanted some of my words in black.  If you want like this look, just trace it with a permanent black marker and fill it.  It makes a great contrast to the sprinkles.

Fill with whatever goodies you want.  They would make great party favors and sprinkles can be changed for any occasion.


Candy-Coated Pretzels

These are a super quick and easy project to give you more time to decorate the sprinkled boxes.  Not much to these but they taste great and are so festive.

Ingredients
Vanilla-flavored or chocolate-flavored almond bark (or white/milk chocolate)
large pretzel sticks
sprinkles, various

Melt your vanilla-flavored almond bark (or melted chocolate).  

Place it in a container conducive to dipping the long pretzel sticks.  It can be in a shallow, flat container as long as it allows your pretzel to be covered completely.

Dip your pretzel sticks.  


Shake off excess and set on waxed or parchment paper to cool.  Before it cools you can put sprinkles on them or wait until they cool to add more decorative icing and sprinkles.


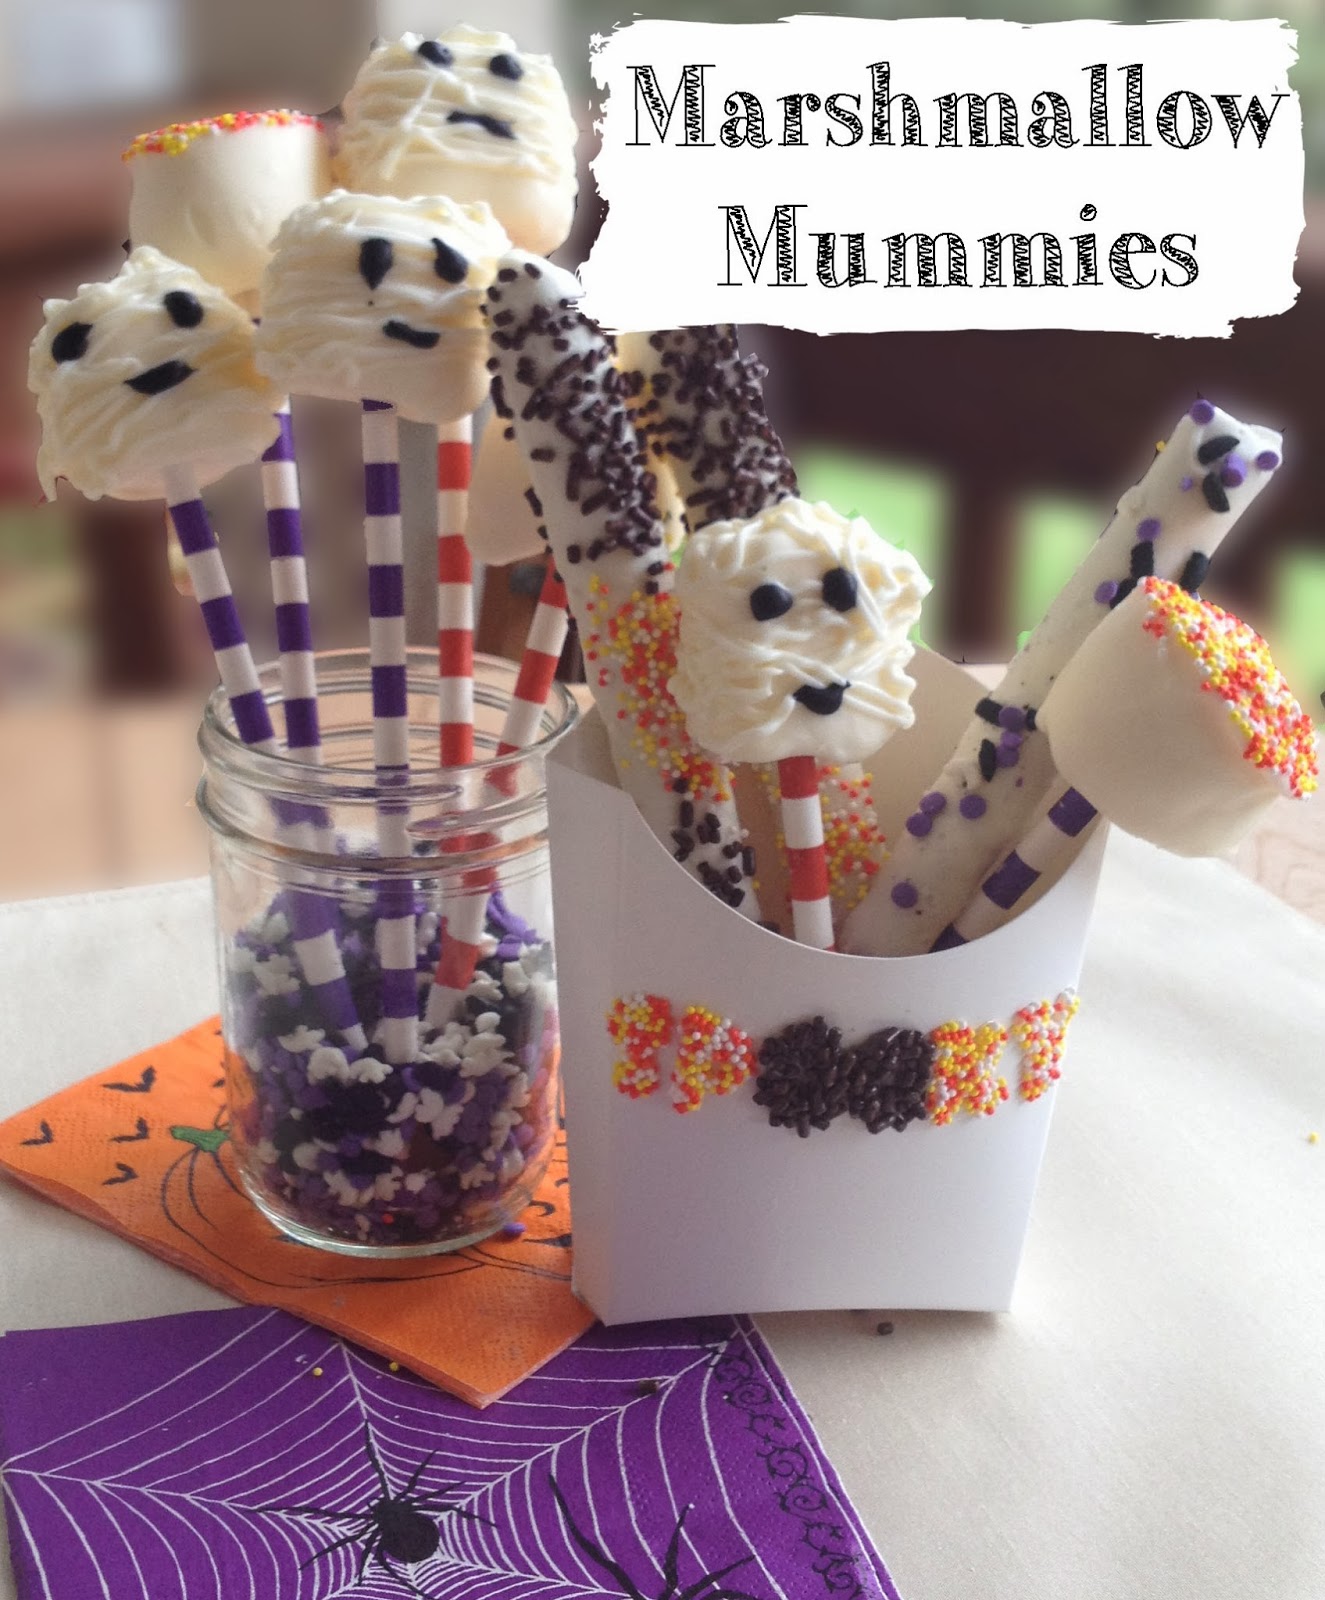
Mummy Marshmallows

These marshmallow mummies are super easy and quick. They make a good gift for my procrastinating self to make the night before Halloween. 

Marshmallow Mummies

Ingredients
24 large marshmallows
24 decorative straws or  wooden dowels
Vanilla-flavored Almond Bark (or white chocolate)
black icing

To make these, use some cute decorative straws or wooden dowels to hold the marshmallows.  Prepare them all and find a place where you can store them to cool.  I just use a Styrofoam block with holes poked in it.  

Melt your vanilla flavored almond bark (or white chocolate - I'm not a fan) and dip the marshmallow into the almond bark.  Shake off the excess and set aside to cool.


Once cool, you can put melted almond bark in a piping bag and drizzle it all around the marshmallow for the mummy wraps.  

Top the mummy off with some eyes and maybe a mouth and it's done.  I just used pre-made black icing from Betty Crocker but I wish I had some of these cute candy eyes from Wilton.

Put your mummies in the awesome Sprinkled French Fry Boxes and you have a great party sweet or fun take home party favor. 


Friday, October 25, 2013

Crockpot Chicken Taco Soup

There are a ton of crockpot taco soup recipes out there. This is, by far, my favorite one.  It's got a great flavor with a little spicy kick to it.  My family loves this on a cool, crisp Fall day.

This can be an easy "dump" recipe if you have all ingredients on hand.  Just dump them all in the pot and turn it on.  Oddly when I went to make the taco soup this time, though, I didn't have taco seasoning.  I always have that on hand!

I remember seeing a homemade taco seasoning on allrecipes.com so I thought I'd try that out.  The recipe for the taco seasoning is linked below or you can just use a package of taco seasoning.  My husband told me this was the best the taco soup I've made yet, though.  I feel like I might not go back to pre-packaged taco seasoning again!

Cool thing about this recipe is that it uses the ever versatile Ro-Tel (another staple in my kitchen).  The Original Ro-Tel is a little spicy so if you don't want that, you can use Mild.  If you like your mouth burning a little, just use Hot Ro-Tel.  They're all good!

Crockpot Chicken Taco Soup

Ingredients
1 can black beans, drained
1 can kidney beans, drained
1 can corn, drained
2 cans RoTel, diced tomatoes and green chiles, undrained
1 can tomato sauce, 8 oz
1 can or bottle of beer, any kind
1.5 pounds chicken breast

1.  Drain the beans and corn and place them in the crockpot.

2.  Add the RoTel, tomato sauce, and beer.


3.  Add the taco seasoning and stir to mix.

4.  Place the chicken breasts on top of the mixture.  I did use frozen chicken breasts.  It might take longer to cook but I'm never in a time crunch when I crockpot dinner so it always cooks well.


4.  Set on low for 7-8 hours, or high for 4 – 5 hours.  Here is what my crockpot looked like after I left the ingredients for 8 hours.


5.  Before serving, shred the chicken into bite sized pieces.  It should break up easily within the crockpot with just a spoon or a fork. 


6.  Serve with your choice of toppings: cheese, sour cream, avocados, tortilla chips.  I just used cheese with a bit of tortilla chips; however, if I had my choice I'd throw some sour cream and avocado on it too!


Homemade Taco Seasoning


I never go without taco seasoning packets in my kitchen. One reason is because we do a Mexican style meal every Friday -- Fiesta Friday we call it -- even though it's probably more like Tex-Mex.  

Another reason I always have taco seasoning is the packets are usually really cheap with coupons so I stock up when I can. I always have them...until I need them. I ran out when I went to make my Crockpot Chicken Taco Soup. Luckily, this homemade taco seasoning I saw on allrecipes.com turned out even better than the pre-made packets. I usually always have these ingredients on hand so it made it very easy to make in place of my taco seasoning packets.


Taco Seasoning 
Printable Version
easilymadeeasilybroken.blogspot.com
Ingredients
1 Tbsp chili powder
¼ tsp garlic powder
¼ tsp onion powder
¼ tsp crushed red pepper flakes
¼ tsp dried oregano
½ tsp paprika
1 ½ tsp ground cumin
1 tsp sea salt
1 tsp black pepper
Combine all ingredients in a bowl.  Makes about ¼ cup.

Original recipe from allrecipes.com


Note: This would also make a great gift using labels on a glass jar. I quadrupled the recipe to fill up this Mason jar and make a full cup, or four servings, of the taco seasoning. You can download the printable labels here that include directions too. I used Avery 15395 labels.

Sunday, October 13, 2013

Pumpkin Spice Cupcake with Maple Buttercream Frosting

I just got some new neighbors across the street.  I'm horrible at starting conversations with people, especially people I don't know so...I bring food.  It's a good ice breaker.

Since it's October, I thought pumpkin cupcakes would be a great treat for them. I stumbled across this recipe from javacupcake.com that I've followed for a while.  Her recipe includes a maple cream cheese frosting but I'm not the biggest fan of cream cheese icing.  It's a bit rich for me so I made mine a buttercream frosting instead.


It's lighter and not as sweet but adds just the right amount  to the pumpkin spice flavor of the cupcakes.  These cakes are so moist and delicious.  We My new neighbor will love them!


Pumpkin Spice Cupcakes with Maple Buttercream Frosting

Printable version
easilymadeeasilybroken.blogspot.com


Ingredients
1 cup all-purpose flour
1 tsp baking powder
½ tsp baking soda
½ tsp kosher salt
1 tsp ground cinnamon
½ tsp ground ginger
½ tsp ground nutmeg
2 large eggs
1 cup canned pumpkin puree, not pie filling
½ cup granulated sugar
½ cup light brown sugar, lightly packed
½ cup vegetable oil
Maple buttercream frosting (see below)

1.  Preheat oven to 350˚.  Line muffin tin with cupcake liners (12).

2.  In a medium bowl, combine the dry ingredients: flour, baking powder, baking soda, salt, cinnamon, ginger, and nutmeg. In a larger bowl or mixer, combine the eggs, pumpkin, granulated sugar,brown sugar, and vegetable oil and whisk together.  Gradually add theflour mixture to the wet ingredients and mix until combine.
3.  Divide the batter into the cupcake liners.  Fillabout 2/3 full.
4.  Bake for 20-25 minutes, until the cupcake springs back tothe touch.  Allow cupcakes to cool completely before frosting.
5.  Using a piping bag and a tip (I use Wilton 1M Star tip),frost the tops of the cupcakes with maple frosting.  Top with a pumpkin shaped candy. 

Maple Buttercream Frosting
Ingredients
3 cups powdered sugar
1/3 cup unsalted butter, at room temperature
¼ tsp maple flavored extract
½ tsp vanilla extract
2-3 Tbsp milk 

In your mixing bowl, slowly mix together the butter, sugar and maple and vanilla extracts.  Gradually add milk as your mixer is combining ingredients until frosting is at the consistency you want.


Cinnamony, pumpkiny goodness topped with a bit of maple sugary flavor.  Simply delicious!