Wednesday, October 30, 2013

Candy-Coated Pretzels in Sprinkled Boxes

This really isn't about the candy-coated pretzels as much as it is about the cute containers I put them in.  I love these french fry boxes!  

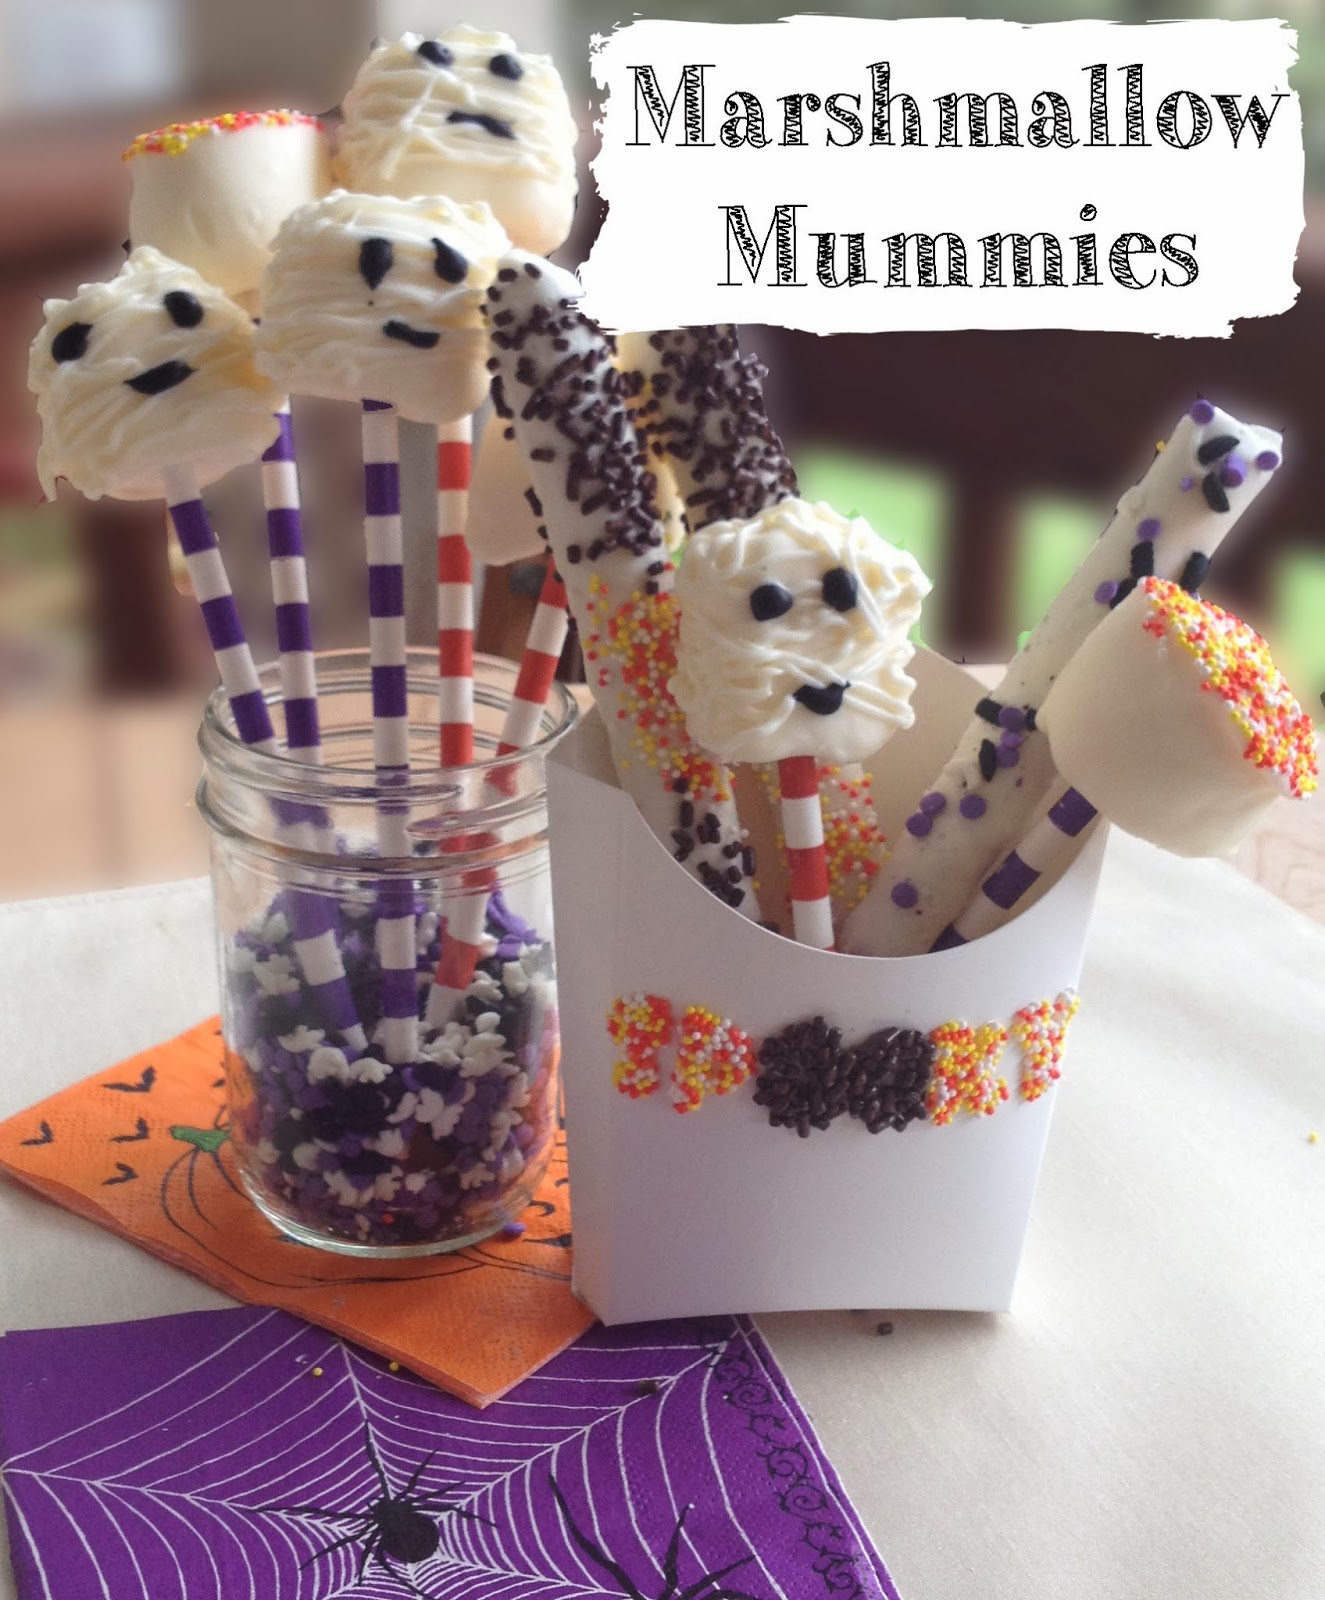
I got a few of these white french fry containers with the idea that I could put treats in them for gifts.  They come blank though and I couldn't figure out what I wanted to do with them until I saw this post on jacksandkate.com with directions on adorable sprinkled party hats.  Using Halloween sprinkles, I semi-emulated her party hats and I love the way they turned out!

Even if you don't have blank french fry boxes, you could use any white box to turn it into an awesome gift box.  In fact, I may be doing the same thing at Christmas and using a plain white gift box to hold tasty goodies for the neighbors.  It might be easier too with a bigger "canvas."

Sprinkled French Fry Boxes


Here's how I decorated the french fry boxes.  I just can't wait to share because I love them so much!

Materials
French fry containers
hot glue gun/glue sticks
Candy sprinkle balls (the smaller the better)
Font pattern
Pen or pencil for tracing

First, select fonts and size them to fit on the front of the french fry boxes. (I used these words and edited the format so they would be an outline. You don't really need to do that but I did it so I would know exactly what to trace.)  Then, print them out on plain white printer paper.

After centering the words where you want them, trace the letters.  I used a red pen so I'd know where I traced.  Press hard so the indentation will show through on the box.  Once done tracing, lift the paper and there should be an outline of the words on the box (in the second picture below) 


Outline each letter you want covered in sprinkles with hot glue.  Cover it in sprinkles just like glitter, shake off the excess, and move on to the next letter.  Complete one letter at a time to ensure the glue stays hot.


You may have to use a toothpick to emphasize the holes or ensure there is space between your letters.

I wanted some of my words in black.  If you want like this look, just trace it with a permanent black marker and fill it.  It makes a great contrast to the sprinkles.

Fill with whatever goodies you want.  They would make great party favors and sprinkles can be changed for any occasion.


Candy-Coated Pretzels

These are a super quick and easy project to give you more time to decorate the sprinkled boxes.  Not much to these but they taste great and are so festive.

Ingredients
Vanilla-flavored or chocolate-flavored almond bark (or white/milk chocolate)
large pretzel sticks
sprinkles, various

Melt your vanilla-flavored almond bark (or melted chocolate).  

Place it in a container conducive to dipping the long pretzel sticks.  It can be in a shallow, flat container as long as it allows your pretzel to be covered completely.

Dip your pretzel sticks.  


Shake off excess and set on waxed or parchment paper to cool.  Before it cools you can put sprinkles on them or wait until they cool to add more decorative icing and sprinkles.


Mummy Marshmallows

These marshmallow mummies are super easy and quick. They make a good gift for my procrastinating self to make the night before Halloween. 

Marshmallow Mummies

Ingredients
24 large marshmallows
24 decorative straws or  wooden dowels
Vanilla-flavored Almond Bark (or white chocolate)
black icing

To make these, use some cute decorative straws or wooden dowels to hold the marshmallows.  Prepare them all and find a place where you can store them to cool.  I just use a Styrofoam block with holes poked in it.  

Melt your vanilla flavored almond bark (or white chocolate - I'm not a fan) and dip the marshmallow into the almond bark.  Shake off the excess and set aside to cool.


Once cool, you can put melted almond bark in a piping bag and drizzle it all around the marshmallow for the mummy wraps.  

Top the mummy off with some eyes and maybe a mouth and it's done.  I just used pre-made black icing from Betty Crocker but I wish I had some of these cute candy eyes from Wilton.

Put your mummies in the awesome Sprinkled French Fry Boxes and you have a great party sweet or fun take home party favor. 


Friday, October 25, 2013

Crockpot Chicken Taco Soup

There are a ton of crockpot taco soup recipes out there. This is, by far, my favorite one.  It's got a great flavor with a little spicy kick to it.  My family loves this on a cool, crisp Fall day.

This can be an easy "dump" recipe if you have all ingredients on hand.  Just dump them all in the pot and turn it on.  Oddly when I went to make the taco soup this time, though, I didn't have taco seasoning.  I always have that on hand!

I remember seeing a homemade taco seasoning on allrecipes.com so I thought I'd try that out.  The recipe for the taco seasoning is linked below or you can just use a package of taco seasoning.  My husband told me this was the best the taco soup I've made yet, though.  I feel like I might not go back to pre-packaged taco seasoning again!

Cool thing about this recipe is that it uses the ever versatile Ro-Tel (another staple in my kitchen).  The Original Ro-Tel is a little spicy so if you don't want that, you can use Mild.  If you like your mouth burning a little, just use Hot Ro-Tel.  They're all good!

Crockpot Chicken Taco Soup

Ingredients
1 can black beans, drained
1 can kidney beans, drained
1 can corn, drained
2 cans RoTel, diced tomatoes and green chiles, undrained
1 can tomato sauce, 8 oz
1 can or bottle of beer, any kind
1.5 pounds chicken breast

1.  Drain the beans and corn and place them in the crockpot.

2.  Add the RoTel, tomato sauce, and beer.


3.  Add the taco seasoning and stir to mix.

4.  Place the chicken breasts on top of the mixture.  I did use frozen chicken breasts.  It might take longer to cook but I'm never in a time crunch when I crockpot dinner so it always cooks well.


4.  Set on low for 7-8 hours, or high for 4 – 5 hours.  Here is what my crockpot looked like after I left the ingredients for 8 hours.


5.  Before serving, shred the chicken into bite sized pieces.  It should break up easily within the crockpot with just a spoon or a fork. 


6.  Serve with your choice of toppings: cheese, sour cream, avocados, tortilla chips.  I just used cheese with a bit of tortilla chips; however, if I had my choice I'd throw some sour cream and avocado on it too!


Homemade Taco Seasoning


I never go without taco seasoning packets in my kitchen. One reason is because we do a Mexican style meal every Friday -- Fiesta Friday we call it -- even though it's probably more like Tex-Mex.  

Another reason I always have taco seasoning is the packets are usually really cheap with coupons so I stock up when I can. I always have them...until I need them. I ran out when I went to make my Crockpot Chicken Taco Soup. Luckily, this homemade taco seasoning I saw on allrecipes.com turned out even better than the pre-made packets. I usually always have these ingredients on hand so it made it very easy to make in place of my taco seasoning packets.


Taco Seasoning 
Printable Version
easilymadeeasilybroken.blogspot.com
Ingredients
1 Tbsp chili powder
¼ tsp garlic powder
¼ tsp onion powder
¼ tsp crushed red pepper flakes
¼ tsp dried oregano
½ tsp paprika
1 ½ tsp ground cumin
1 tsp sea salt
1 tsp black pepper
Combine all ingredients in a bowl.  Makes about ¼ cup.

Original recipe from allrecipes.com


Note: This would also make a great gift using labels on a glass jar. I quadrupled the recipe to fill up this Mason jar and make a full cup, or four servings, of the taco seasoning. You can download the printable labels here that include directions too. I used Avery 15395 labels.

Sunday, October 13, 2013

Pumpkin Spice Cupcake with Maple Buttercream Frosting

I just got some new neighbors across the street.  I'm horrible at starting conversations with people, especially people I don't know so...I bring food.  It's a good ice breaker.

Since it's October, I thought pumpkin cupcakes would be a great treat for them. I stumbled across this recipe from javacupcake.com that I've followed for a while.  Her recipe includes a maple cream cheese frosting but I'm not the biggest fan of cream cheese icing.  It's a bit rich for me so I made mine a buttercream frosting instead.


It's lighter and not as sweet but adds just the right amount  to the pumpkin spice flavor of the cupcakes.  These cakes are so moist and delicious.  We My new neighbor will love them!


Pumpkin Spice Cupcakes with Maple Buttercream Frosting

Printable version
easilymadeeasilybroken.blogspot.com


Ingredients
1 cup all-purpose flour
1 tsp baking powder
½ tsp baking soda
½ tsp kosher salt
1 tsp ground cinnamon
½ tsp ground ginger
½ tsp ground nutmeg
2 large eggs
1 cup canned pumpkin puree, not pie filling
½ cup granulated sugar
½ cup light brown sugar, lightly packed
½ cup vegetable oil
Maple buttercream frosting (see below)

1.  Preheat oven to 350˚.  Line muffin tin with cupcake liners (12).

2.  In a medium bowl, combine the dry ingredients: flour, baking powder, baking soda, salt, cinnamon, ginger, and nutmeg. In a larger bowl or mixer, combine the eggs, pumpkin, granulated sugar,brown sugar, and vegetable oil and whisk together.  Gradually add theflour mixture to the wet ingredients and mix until combine.
3.  Divide the batter into the cupcake liners.  Fillabout 2/3 full.
4.  Bake for 20-25 minutes, until the cupcake springs back tothe touch.  Allow cupcakes to cool completely before frosting.
5.  Using a piping bag and a tip (I use Wilton 1M Star tip),frost the tops of the cupcakes with maple frosting.  Top with a pumpkin shaped candy. 

Maple Buttercream Frosting
Ingredients
3 cups powdered sugar
1/3 cup unsalted butter, at room temperature
¼ tsp maple flavored extract
½ tsp vanilla extract
2-3 Tbsp milk 

In your mixing bowl, slowly mix together the butter, sugar and maple and vanilla extracts.  Gradually add milk as your mixer is combining ingredients until frosting is at the consistency you want.


Cinnamony, pumpkiny goodness topped with a bit of maple sugary flavor.  Simply delicious!

Saturday, October 12, 2013

Dollar Store DIY Fall Squash Wreath

I was perusing my Southern Living magazine and saw a really neat looking fall wreath (pictured at the right).  It didn't look like it would be that hard to make.  Just a foam wreath, a few squash, and some moss to fill in the blank areas.  When I considered the cost of the squash, which last I looked was about $0.50 each, and the wreath, which was $14, I realized this wreath could cost a pretty penny.  I decided to see what I could find at our local Dollar Tree.


Here's my Dollar Tree interpretation of the Southern Living squash wreath (which, by the way, only cost me $13.69...less than the cost of the foam wreath!).  While I admit my version really looks nothing like the Southern Living version, I still like the way it turned out.  Even better, I like the price!


Dollar Store DIY Fall Squash Wreath

easilymadeeasilybroken.blogspot.com

NOTE:  All of these items with exception of the floral ring were purchased at my local Dollar Tree.  The wooden floral ring was purchased at Michaels.  Priced at $4.49, I used a 40% off one item at Michaels to get the ring for $2.69.


Supplies:
1 Wooden floral ring
1 Roll 2-2 1/2 inch wide ribbon
35-40 Styrofoam squash (come in packs of 5)
1-2 packages Reindeer moss
1 package Raffia ribbon (optional)

Supplies I already had:
Hot glue gun/glue sticks
Mod Podge (or cheap version of it)

1.  Begin by looping your ribbon around the top of your wreath to create a hanger.  Make it long enough to hang at about eye level on your door.

2.  Lay out your squash around the wreath ring so you know where you want each squash.  Alternate colors and types of squash so the squash is varied throughout.

Using the hot glue gun, place glue on the bottom of the squash and then press the squash onto the wooden wreath ring.  Hold in place until it doesn't move.


3.  Once you have glued down all of your squash, you will add the moss in the blank spaces where any of the wooden wreath shows through.  I couldn't access these areas with my glue gun because it has such a stubby tip on it.  I used a foam brush and my own version of Mod Podge that I made for cheap (just equal parts white school glue and water!!).

I brushed my homemade Mod Podge in between the squash onto the wooden ring and pressed moss onto the wood form.  You may have to use a lot of Mod Podge to make the moss stick.  Don't worry about blank spots along the edges because you will go back with the glue gun to fill those in.

Continue around the squash, filling in all the blank areas with moss.


4.  Time to fill in any areas where the moss wouldn't stick.  I don't know how yours will fare but my wreath had a lot of blank spaces.  All of my inner and outer edges of the ring didn't have any moss on them.  They looked like this:


To fix this, just go around the edges with your hot glue gun.  Squeeze glue from your hot glue gun onto the edges and then press moss on it.  It covers the edges nicely and helps the moss stick better than the Mod Podge.  

Here's the finished wreath just hanging off my kitchen counter.  I had to shake it quite a bit to get a lot of the loose moss off.  It's a bit like working with glitter.


Here is what my finished wreath looked like on my front door.  I thought the middle of the wreath was really big and a bit blank so using raffia, I added some squash to hang down into the middle of the wreath.  I'm not sure if I really like it yet.  I think I'll be getting my husband to cut a pumpkin shape with some spare wood we have so I can paint a pumpkin for the center of my wreath.  It would also be really cute with just our family initial painted to match.

I'm also not sure about using the ribbon to hang it.  While I like the look of it, it's not that easy for me to hang a wreath like this.  Instead, I took the hanger down and put it into a bow to hide hang the wreath on.  This is how I have it hanging on my door now (even though this picture is on my wall!).


Thursday, October 10, 2013

Be-Witched Cupcakes

I made some of these chocolate witch hats that I posted about earlier today. While they were cute, I wasn't sure what to do with them besides look at them and eat them (which is really enough because those shortbread cookies are pretty darn good).  I wasn't having a party so I didn't need a cute platter of witch hats.  I decided to make cupcakes with them so I could share them with my husband's coworkers. And abracadabra, the Be-Witched cupcakes appeared!

Be-Witched Cupcakes

Ingredients
24 chocolate cupcakes
Orange frosting
Black frosting
White frosting
Black frosting
Green Mike & Ike candies

1.  Begin with your chocolate cupcakes and green frosting in a piping back with no tip.  Start in the center with your frosting and squeeze a “blob” on to the cupcake.  Make it tall enough that you’ll have room for the witch’s face.


2.  With your orange frosting in a bag with a small hole, drizzle “hair” on the top of the green icing.


3.  Top the hair with the Witch’s Hat you made.


4.  Add eyes with the white frosting in a bag with a small hole.


Or use the Wilton candy eyes that would be perfect for this.  In fact, the picture of the witch in the top right of the package looks a bit like this witch.


5.  Using the black frosting, at small dots in the middle of the white eye and add a squiggly mouth line to the bottom of the green icing.  

I used a bagged frosting but it's very drippy so you have to make sure you cut the hole extremely small and only use a very small amount of frosting or your eyes will be runny.


6.  Add teeth with the white frosting around the black mouth.  Place the green Mike & Ike into between the eyes and mouth, fat end into the frosting to make the nose.


7.  Top the witch with a few warts by placing dots of green icing on the tip of the nose and on the side of her face.


Your cupcakes have been Be-Witched!  My kids had a great time with these.

Witch's Hats

When I first got into Pinterest a couple of years ago it was around Halloween.  I was overwhelmed with all the awesome ideas I saw but didn't get a chance to do them.  

I remember seeing these witch's hats all over. There is a huge assortment of them out there if you search "chocolate witch hats."  These are my own interpretation of them.  They're SO easy but they really make a cute, festive, and tasty decoration or you can use them on the top of a cupcake, too.

Witch’s Hats

Ingredients
Unwrapped Hershey’s Chocolate Kisses (24)
Chocolate Striped Shortbread Cookies (24)
Orange frosting, in a bag with a very small tip

1.  Turn the chocolate striped shortbread cookies upside down with the solid chocolate side showing.
2.  Put a thin layer of frosting around the bottom edges of the Hershey’s Kiss.

3.  Place the Hershey’s Kiss frosting side down onto the middle of the cookie.


4.  Using the orange frosting, place a thin stripe around the base of the Hershey’s Kiss to make a hat band.  Draw a bow on the front of the hat with the orange frosting as well.


Super easy to make and SO cute!  Use these by themselves or top off onto Be-Witched Cupcakes!