Showing posts with label halloween cupcakes. Show all posts

Thursday, October 10, 2013

Be-Witched Cupcakes

I made some of these chocolate witch hats that I posted about earlier today. While they were cute, I wasn't sure what to do with them besides look at them and eat them (which is really enough because those shortbread cookies are pretty darn good).  I wasn't having a party so I didn't need a cute platter of witch hats.  I decided to make cupcakes with them so I could share them with my husband's coworkers. And abracadabra, the Be-Witched cupcakes appeared!

Be-Witched Cupcakes

Ingredients
24 chocolate cupcakes
Orange frosting
Black frosting
White frosting
Black frosting
Green Mike & Ike candies

1.  Begin with your chocolate cupcakes and green frosting in a piping back with no tip.  Start in the center with your frosting and squeeze a “blob” on to the cupcake.  Make it tall enough that you’ll have room for the witch’s face.


2.  With your orange frosting in a bag with a small hole, drizzle “hair” on the top of the green icing.


3.  Top the hair with the Witch’s Hat you made.


4.  Add eyes with the white frosting in a bag with a small hole.


Or use the Wilton candy eyes that would be perfect for this.  In fact, the picture of the witch in the top right of the package looks a bit like this witch.


5.  Using the black frosting, at small dots in the middle of the white eye and add a squiggly mouth line to the bottom of the green icing.  

I used a bagged frosting but it's very drippy so you have to make sure you cut the hole extremely small and only use a very small amount of frosting or your eyes will be runny.


6.  Add teeth with the white frosting around the black mouth.  Place the green Mike & Ike into between the eyes and mouth, fat end into the frosting to make the nose.


7.  Top the witch with a few warts by placing dots of green icing on the tip of the nose and on the side of her face.


Your cupcakes have been Be-Witched!  My kids had a great time with these.

Friday, October 4, 2013

Frankenstein Marshmallow Cupcakes

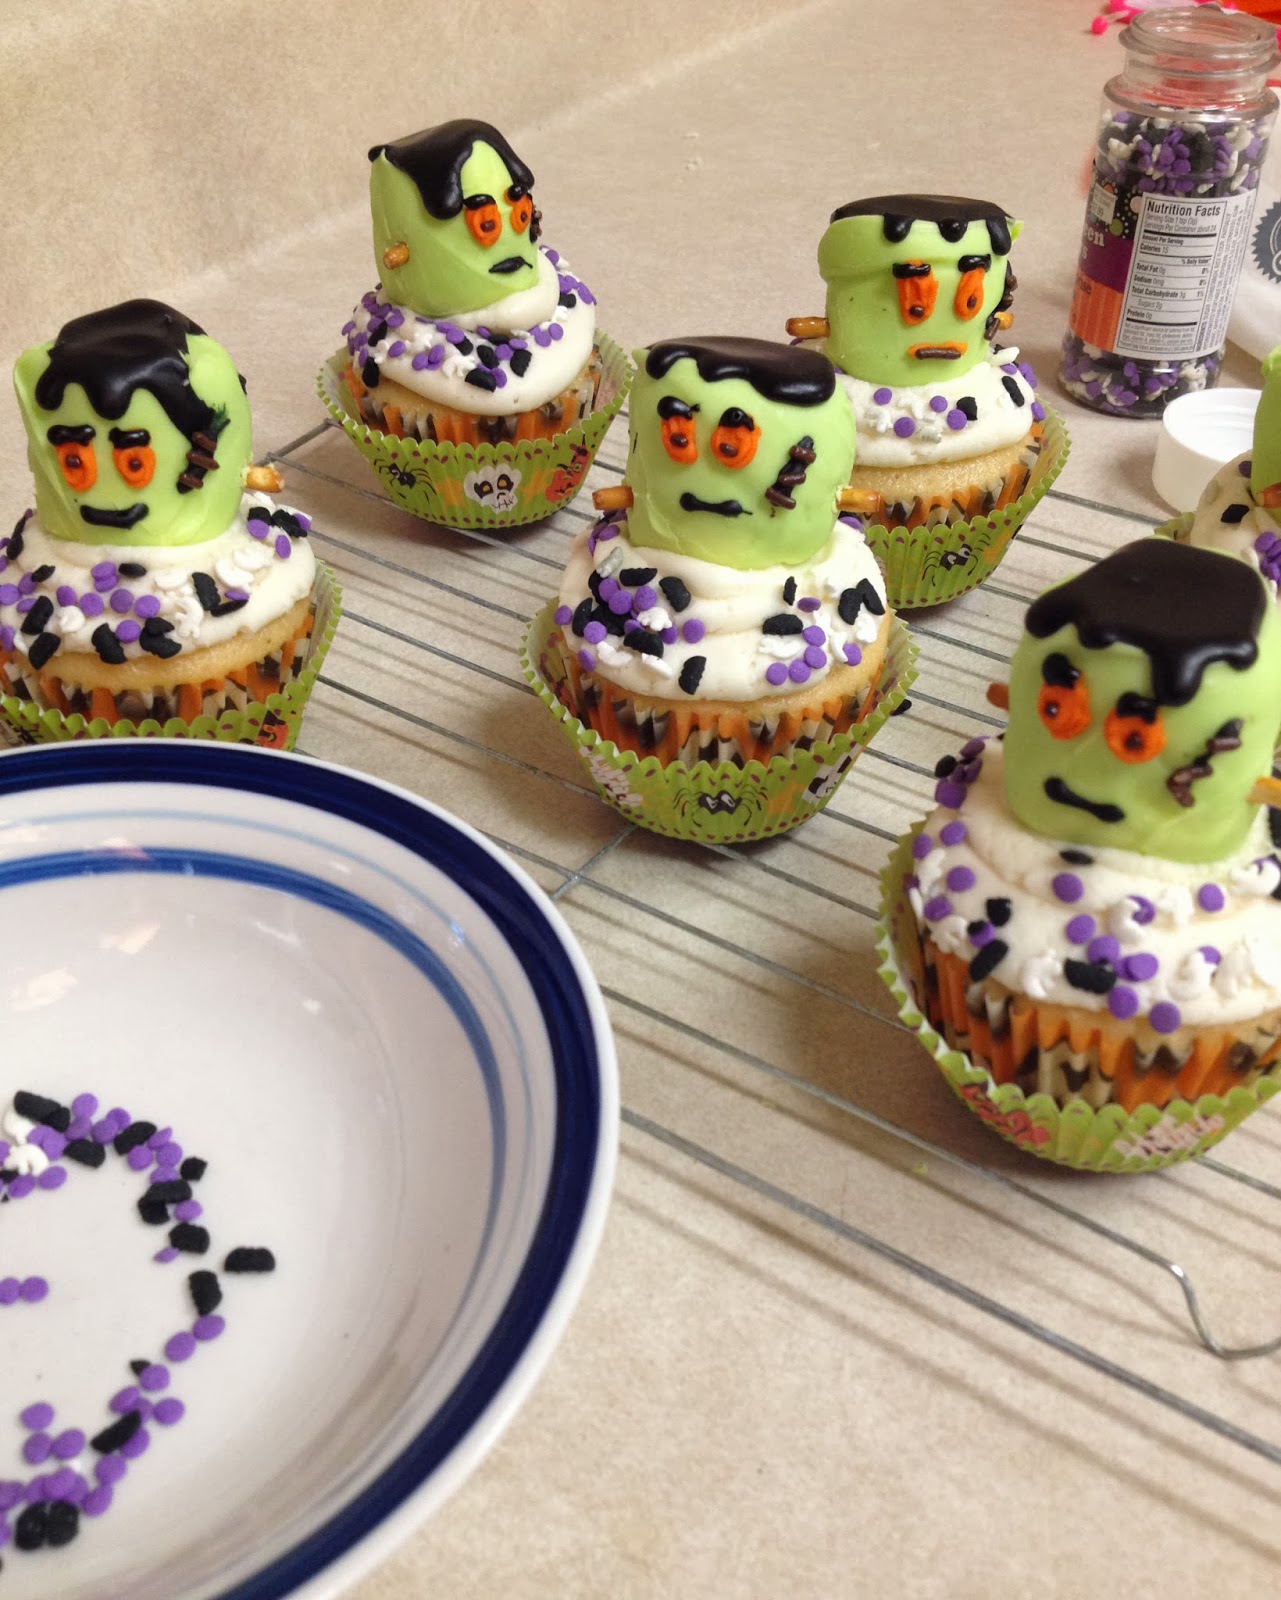
I'm on a cupcake kick right now.  I've always enjoyed making cupcakes and Halloween just seems like a great time to add fun decorations.  This has been my favorite decoration so far!  These Frankenstein marshmallows are so much fun to make! I had a "monster" of a good time!

Using vanilla cupcakes and vanilla buttercream as the base, most of the work is in the marshmallow topper, so use boxed cake mix if you prefer.  It will save the time you'll use on decorating the marshmallows.

Frankenstein Marshmallow Cupcakes

Printable version
easilymadeeasilybroken.blogspot.com


To make these cupcakes, you'll need:
24 Vanilla cupcakes (use a box mix to save time, if needed)
24 large marshmallows
Vanilla flavored Almond Bark (use white chocolate if you prefer)
Black pre-made icing
Orange pre-made icing
Chocolate sprinkles
24 small pretzel sticks, ends broken off


1.  Begin by preparing your marshmallows for dipping.  When you melt the Almond Bark it cools very quickly so you  need to be ready to dip.  I used skewers to hold my marshmallows and a block of Styrofoam to stick them in.  Use whatever you have handy, though.  Toothpicks or Popsicle sticks should work too.

2.  Melt your Almond Bark (or white chocolate - I just don't like the taste of white chocolate).  I use a microwave because it's just easy.  Put it in a bowl, microwave for 30 seconds, stir, then microwave at 10 second intervals, stirring each time until melted.  Add a little green food coloring until you reach the color desired.  Once my chocolate was colored, I moved it to a smaller, deeper bowl to dip that would completely cover the marshmallow.


3.  Dip your marshmallows in the chocolate covering the top and sides completely.  It doesn't matter if the bottom is not covered because that will sit on the cupcake.  Work quickly because the Almond Bark hardens fast.  I only did 10-12 at a time with a 1/2 of the Almond Bark because I was afraid it would cool before I completed all 24.  It might be best to melt a little Almond Bark at a time to work with.


Place your marshmallows back on the Styrofoam to cool.  It really doesn't take long at all. 
  

Time to Decorate!!

4.  Once the marshmallows have hardened, you can add the hair.  I used black colored cookie icing.  This icing is neat because it smooths out after sitting, however it can be really drippy so it's best to not use a lot on the sides of the marshmallows.
Add the black icing to the top of the marshmallow.  You can also scallop it around the front to look like hair but, again, it's very drippy so don't make it too thick there.

5.  Using orange icing (I had some left over from my Pumpkin Iced Vanilla Cupcakes but you can use packaged icing as well), make circles for eyes on the front of the marshmallow.  Then, using a small chocolate sprinkle, add these to the center of the eye.  

It would also be fun to use those candy eyes that Wilton makes.  I wonder if these would be too big?


Using the a VERY thin line of black icing, draw the mouth and a scar on the side of the Frankenstein's face.  You can also add eyebrows.  I don't show them in the image but my completed picture has them (I forgot to add them here!).  Add sprinkles to the scar to look more like stitches.


6. Take the ends of the pretzels and place them on the sides your Frankensteins for the bolts. 


I had some bolts fall out of my Frankensteins when I was adding them to the cupcake.  I just added a little white frosting to them and stuck the bolts (pretzel ends) back in Frank's head.


7.  Adding the Frankenstein marshmallows to the cupcakes was the easiest part.  I stuck with a very simple bottom of vanilla butter cream with some Halloween sprinkles.

Pour the sprinkles in a bowl to roll the frosted cupcake in.  Using a piping bag with no tip, add frosting around the edges of the cupcake, leaving the center plain.  Roll the frosted cupcake in the sprinkles to add sprinkles around the edges.


 8.  Take your decorated Frankensteins and add a dollop of vanilla butter cream frosting to the bottom of it.  Add the marshmallow to the center of the cupcake.  You might have to push down and twist a little but it should stick pretty well to the cupcake.


9. And there you have it.  You've created a MoNsTeR!  It's ALIVE!!  ALIVE!!


Pumpkin Iced Vanilla cupcakes and the Frankenstein Marshmallow cupcakes in a box ready to gift


Thursday, October 3, 2013

Goin' Batty Cupcakes


What's better than chocolate icing?  Chocolate icing covered in sprinkles!!

These adorable bat cupcakes start out with a chocolate cupcake and chocolate frosted foundation.  Add a Whopper malted candy, a couple of shortbread cookies, and some icing makes a frighteningly cute bat to the top of the mound of chocolate frosting.


Goin' Batty Cupcakes


Ingredients
Chocolate Cupcakes
Chocolate Frosting
Chocolate Sprinkles
Mini striped shortbread cookies, 2 per cupcake
Whoppers Malted Milk Balls candy, 1 Whopper ball per cupcake
Colored icing


1.  Using a piping bag with no tip, pipe the chocolate frosting on top of your chocolate cupcakes.

2.  Dip the frosted cupcake into the chocolate sprinkles and roll it around until the whole top is covered in sprinkles.

3.  Place one Whopper ball in the middle of the cupcake.

4.  Decorate the back of each cookie (the chocolate side) with an icing shaped bat wing, one for each side of the bat.

5.  Place the decorated cookies into the chocolate frosting behind the Whopper ball, one on each side so that bat appears to have two wings.

6.  Decorate the bat face with eyes and a smile (if you want a happy bat).


Now, you have yourself a chocolatey, delicious bat cupcake.


Wednesday, October 2, 2013

Pumpkin Iced Vanilla Cupcakes


Fall is a perfect season for cupcakes.  Actually, I think every season is a good season for cupcakes but Fall is a great season for decorating them.  With Halloween, the ideas are endless and there are always opportunities to make cupcakes to share. This pumpkin iced cupcake for Fall doesn't require much extra effort to make an extremely cute seasonal treat.


Pumpkin Iced Vanilla Cupcakes
 
Begin with your cupcake.  You can fix your cupcake from scratch with this recipe or make it from a box. As long as you have a foundation to work with, it doesn't matter where it comes from.

You'll also need some frosting. I suppose you can use a canned frosting but it's nice to have homemade because you can make it the consistency and flavor that you want.  Here's my favorite buttercream recipe.

Vanilla Buttercream Frosting
Printable version
4 ½ cups powdered sugar
½ cup stick butter, softened
1 ½ tsp vanilla
2-3 Tbsp milk
Food coloring gel, orange

In a medium bowl, mix the sugar and butter then stir in the vanilla and add milk until it's smooth and at the consistency you are looking for.   

Add food coloring gel until completely mixed and the color is right.  

For the pumpkin cupcakes, you will need two different colors.  Set aside about ½ cup of white frosting before creating the orange.  With the icing you set aside, you can add green food coloring gel to have a small bag of green frosting.


Pumpkin Decorated Cupcakes
Ingredients
vanilla buttercream - colored orange
vanilla buttercream - colored green
orange sugar sprinkles
Kit Kat minis

1.  After you create your orange frosting (I had to use "golden yellow" and "red" to make mine since I didn't have orange gel), you can begin creating your pumpkin cupcakes.  Use a piping bag without a tip to get a smooth frosted top for your cupcake.
2.  Pour the orange sugar sprinkles in a bowl wide enough to hold the cupcake.  With a smooth frosted top, turn the cupcake upside down and roll the iced top in the sprinkles.  Roll the sides first then roll the top of the cupcake to smooth it out.


3.  Once your cupcakes are frosted and sugared, place a mini Kit Kat in the middle of the cake, standing up like a stem.


4.  To add more color to your pumpkin, you can also add a leaf or two to the edge of the Kit Kat.  There are special tips for making leaves but I just used a Ziplock bag.  

Add your green frosting to the bag and cut the corner at a bit of an angle, with the seam of the bag facing up.  This seam, along with the angle, will help make the "leaf" come out with a line on it. 

If this seems too complicated, you can also just cut a small tip off the bag to make a squiggly vine around the Kit Kat stem.

5.  Now that you have leaves or vines, you've got yourself a pumpkin cupcake!  Looks adorable and is delicious too!